How to Clean a Shop Vac Filter After Dirty Work
Photo: istockphoto.com
Considering the abuse that most shop vacs see on a regular basis, they have a pretty tough life full of dirt, grime, nasty liquids, and neglect. Yes, neglect—we’re talking filters, here. Letting that old filter clog up with dirt and dust is a crime against shop vacs.
When a shop vac’s suction starts to dwindle, or it doesn’t have the same output for other tasks, it’s usually the result of a clogged filter, sometimes caused by poor shop vac cleaning and maintenance. While the easiest solution is to replace it, it’s possible to clean a filter many times before it ends up in the trash. The following steps detail how to clean a shop vac filter after dirty work.
Tools & Materials We are a participant in the Amazon Services LLC Associates Program, an affiliate advertising program designed to provide a means for us to earn fees by linking to Amazon.com and affiliated sites.BEFORE YOU BEGIN
The substances that a shop vac sucks up are nasty, and cleaning a shop vac filter often releases those particles into the air. Clean your shop vac filter outside and wear a respirator to avoid breathing in the yuck.
Also, the following steps will work for a shop vac HEPA filter, as well.
STEP 1: Knock the dust loose.
Photo: istockphoto.com
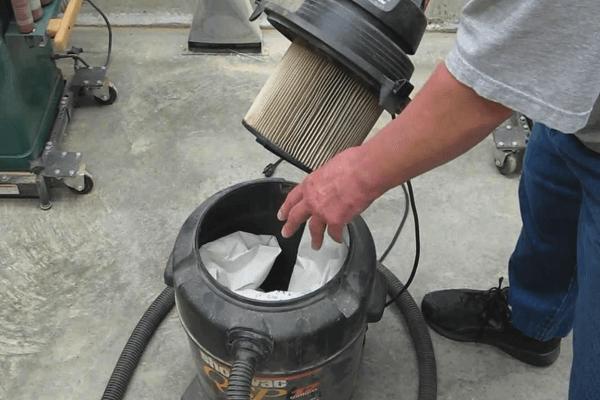
The majority of shop vac filter cleaning is very simple: Remove the filter and bang it against the side of a trash can. But this does create a lot of dust, so consider this method instead:
Don a pair of work gloves and hold the filter in one hand. Place your entire arm inside a trash bag and use the other hand to close it around your arm. Now, tap the filter against a sturdy surface to loosen the dust. Wait a minute or two for the dust to settle before releasing the garbage bag.
STEP 2: Dig the dried dirt loose.
Banging the wet dry vac filter might not be enough to remove the build-up between the pleats or along the rubber seal. It might be tempting to go to work at those clumps with a brush, but the bristles will ruin the paper. It’s best to lightly dig them out with a smooth plastic scraper or putty knife. Be careful not to poke the tip of the scraper through the paper or you’ll have to throw the filter in the trash.
STEP 3: Use compressed air to remove embedded dust.
Photo: istockphoto.com
With the bulk of the dust, hair, dirt, and other particles removed, it’s time to remove the embedded particles. Any time you’re working with compressed air, it’s a good idea to don a pair of safety glasses to avoid flying chunks from entering your eyes.
Lower the compressor pressure to around 40 PSI (interestingly, the same pressure used to blow out AC filters), and use an air chock to blow the embedded particles loose. Spray the filter from the outside, and then spray again from the inside, being careful not to rip the paper pleats or deform them permanently with too much pressure.
STEP 4: Wash the filter in a bucket of warm, soapy water.
To remove the remaining particles, give the shop vac filter a bath. Fill a bucket with warm soapy water (dishwashing liquid is a great choice since it breaks down grease) and soak the filter for 10 minutes. After soaking, plunge the filter up and down several times to remove the dust, dirt, and oils that might still be hanging on. After the bath, rinse the filter with a garden hose to remove the soapy water from the pleats.
STEP 5: Let the filter dry.
Photo: istockphoto.com
The filter might be nearly as good as new, but it’s not ready to get back to work yet. It needs to dry first.
Putting a wet filter back into a shop vac and then using the shop vac will cause the dirt to clog the filter immediately and create a concrete-like consistency. Also, putting a wet filter back into a shop vac and not using it can cause mold and mildew.
Leave the filter in the sun for a few hours to dry completely. To hasten the process a bit, use the air chuck to blow some of the water out of the pleats.
Over time, the pleats will deform and the paper will thin. This will cause the filter to become less effective, requiring a shop vac filter replacement, so it’s helpful to keep your shop vac parts list handy. But, with those steps for cleaning a shop vac filter, you’ll be able to restore your vac’s suction and capability. And, you’ll no longer be guilty of shop vac neglect, enabling your machine to clean up your messes for many more projects to come.

