DIY Workshop: How to clean up and restore a vintage guitar
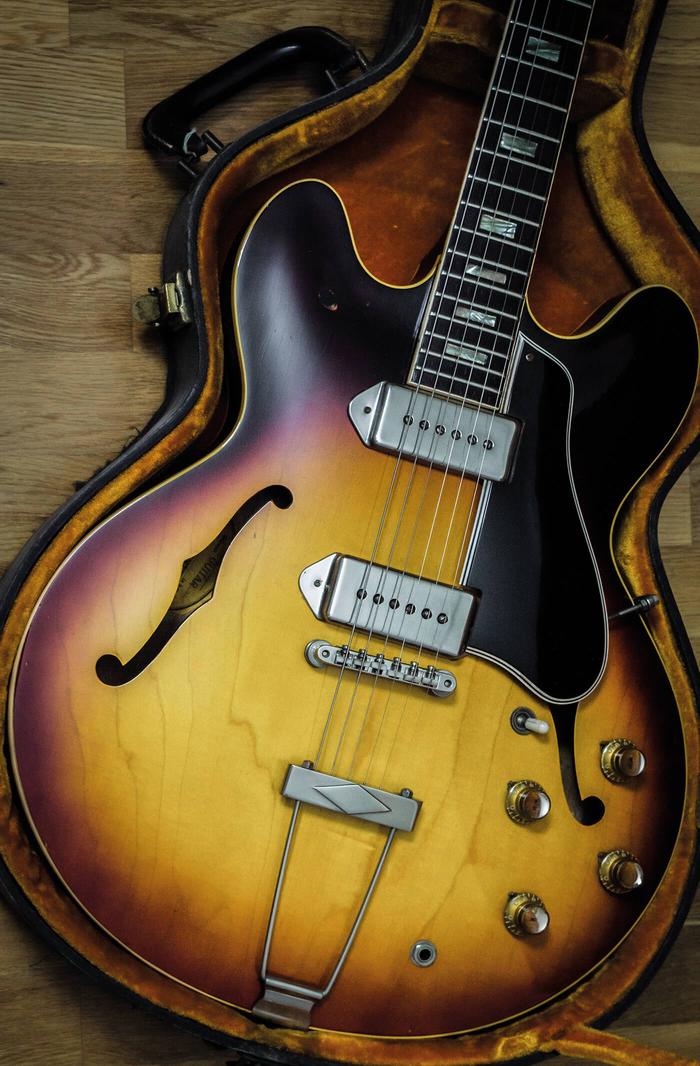
This ES-330 was recently acquired from its second owner, Paddy Collins, whose dad bought it for him from Snell’s music shop in Swansea, UK back in 1967. Paddy’s bandmate in the early days was Mike Japp, who later played with Marmalade and Joe Brown’s band and went on to write songs with Paul Stanley, among others. When Paddy switched to drums, Mike would often play this ES-330 and according to Paddy, he was the last person to string the guitar up.
Sadly, Mike Japp passed away in 2012, so these strings do need changing. But that’s the least of it – Paddy stopped playing a long time ago and the guitar has spent most of the last 30 years stored in its case. The upshot is that the finish is in decent shape, but the lacquer is very dull and dirty and all the nickel parts have oxidised.
Although some vintage-guitar owners are reluctant to clean their guitars, I prefer them when they look cared for and feel nice. I would make a distinction between dirt and patina and, on a practical level, I find that guitars play better and strings last longer when fingerboards are dirt-free and frets are shiny and smooth.
AdvertisementRead on to find out how to clean up the parts and finish as we detail the processes involved in making a wonderful old guitar look and sound its best…
Initial assessment
Although the guitar is mostly original, for some reason, the neck-pickup cover is the wrong way around and the bridge-pickup tone knob has been replaced. It’s pretty obvious, because it’s a different colour and size to the others and it won’t push down onto the control pot.
We check the electrics and everything turns out to be working – except the bridge tone control. Peeking inside with an inspection mirror, all the pots and the ‘black beauty’ tone capacitors appear to be original. The wiring harness will have to come out so I can fix or replace the potentiometer and I plan to source a vintage knob to replace the non-original part.
Missing fingerboard inlays are all-too common on vintage Gibsons, but I’m relieved to see that all the inlays are still present and correct on this ES-330. Even so, most are just about hanging in there and will need to be re-glued. The fingerboard is relatively clean, but I think there’s room for improvement.
AdvertisementHappily, the finish is largely unfaded and retains its vibrant mid-60s sunburst. Lacquer checking is fairly moderate but the finish looks dull and grimy. There’s a cloudy milkiness that’s particularly apparent on the darker edges of the ’burst, along with the grease marks and dirt build-up that are typical of any well-used guitar.
Stripping down
It’s all too easy to lose vital parts when dismantling a guitar, so I always have an old tub in close proximity to keep everything in one place. I begin by removing the strings, tailpiece, bridge and thumbwheels. Lifting off the tailpiece reveals the ground wire and I suggest placing masking tape over the wire if you want to prevent it from being pulled inside the body.
Since the harness is coming out, it’s not necessary in this case and I remove all the nuts and pointer washers from the potentiometers. I also remove the jack-socket nut and use a specialised tool to release the knurled nut from the switch.
I remove both pickup covers and pull the pickups out of their holes and place them to one side. With a little encouragement, the harness drops into the body and I’m able to pull everything out of the bridge-pickup cavity. A colossal dust ball has wrapped itself around the harness and after dislodging it, I set about brushing all the remaining dust off the pots and switch.
The pots feel stiff, so they all get a generous squirt of DeoxIT D5 cleaner, which loosens them up considerably. I decide to test the harness while it’s out of the body and to my relief, I discover that the bridge tone control is functioning again and everything appears to be in perfect working order. This is an opportunity to read the date codes on the potentiometers and I discover they were all made by CTS in the 46th week of 1964. I also clean the finish around all the cavities while I have unobstructed access, but I’ll discuss that in more detail later.
I won’t pretend that getting a wiring harness inside a semi-hollow or hollowbody guitar is easy and the first time I tried it, it took me a fortnight to put my guitar back together – a 1965 ES-330, in case you’re wondering. I’ve tried all the luthier tricks such as lengths of rubber tubing over the pot shafts and nylon threads to pull everything back through the holes, but I’ve always got myself into a tangle.
Instead, I tie threads only to the jack socket and neck tone pot, because I find that once they’re back in position, the other parts usually line up under the holes and two threads are a lot less likely to tangle. Once that’s navigated successfully, the reinstalled controls can be tested once again and our attention shifts to the fingerboard inlays.
Glueing the blocks
1 of 2All but one of the celluloid markers has lifted at one end or the other and rather than remove each one, clean out all the old glue and stick them back down, I prefer to run water-thin Super Glue under them and press them tight while the glue goes off. This technique may not meet with universal approval, but I’ve never had one lift back up.
I focus on one inlay at a time and before applying the glue, I lay masking tape around the block to prevent the glue from spreading where it’s not required. Water-thin glue wicks into the gaps and it doesn’t take long before the block is stuck fast and I’m able to peel off the masking tape. Where there is glue squeeze-out, I’m able to scrape it flush using a utility knife blade and the whole job is completed quite quickly.
Reviving the finish
I’m always astonished how well vintage Gibson lacquer cleans up. Grease and oils tend to get into the finish and layers of dust and dirt will give even the best-preserved finish a dull and hazy appearance. I also find that when the lacquer on the back of a neck is left uncleaned, it can feel increasingly sticky and slow after being played for a while.
Traditionally, guitarists and techs have used automotive-style abrasive compounds such as T-Cut, Farécla G3 and machine polish to buff out lacquer finishes. I’m not a huge fan of T-Cut on guitar finishes because I find it quite aggressive; I dislike the ammonia and when it dries, it leaves a powdery residue in chips and cracks.
My preferred product is Virtuoso Premium Cleaner, because it’s so effective at lifting all the grease and dirt out of a finish without damaging it. In addition to bringing a finish back to its best, I find it cures the aforementioned sticky neck problem.
It still takes a lot of elbow grease, but if you’re patient, the results can be stunning. You can follow up with a specialised guitar polish and on this occasion, I go with MusicNomad Pro Strength. The Virtuoso polish is good, too, and most experts recommend avoiding polishes containing silicone.
In total, I spend a few hours cleaning and polishing, taking off the tuners during the process. By the end, the finish is gleaming and the colours appear far more vibrant. The high shine will dull naturally over time, but little effort will now be required to bring it back. My primary concern was to clean the finish rather than make the guitar look like new and it has certainly been worth it.
Dark metal
Although this ES-330 has metal pickup covers, as a 1964 example the plating is nickel rather than chrome. While chrome tends to retain its gleam, nickel has a softer look and tendency to dull down as it oxidises.
In large part, that’s why most vintage-guitar fans prefer nickel to chrome, but the plated parts on this guitar have turned a dull grey and developed an unpleasant, powdery texture. I certainly don’t want to try to make the hardware look new again, but I do want to restore some of the nickel colour and lustre.
I opt for Autosol chrome cleaner and begin polishing up the parts by hand. Compared to the lacquer, I actually spend relatively little time on this because I’m able to achieve the look I want quite quickly. I’m also careful to remove all the polish residue.
The only part of this clean-up operation that’s especially laborius is dealing with the ABR-1 bridge. I carefully remove the corroded retaining wire, mindful of how prone they are to snapping. The nylon saddles are removed and placed to one side in order, ready for refitting once the bridge is polished.
Before too long, I’m ready to mount all the hardware back onto the guitar. I replace the knobs, too – including a vintage replacement that I found online. In the process, I learned that not all vintage reflector knobs were created equal and there are differences in height, the depth of the collar around the top and the height of the pot shaft section in the centre relative to the gold lacquer.
Once shipping and taxes were added to the purchase price, this replacement knob ended up costing almost £40. It seems a bit crazy, but at least the ES-330 has a full set of matching knobs once again and the fact that the lettering has worn off is neither here nor there.
Back on the ‘board
Cleaning the finish and hardware is an aesthetic preference and some vintage-guitar fans may prefer the way this guitar looked before I started cleaning it up. I respect that and think it’s a perfectly valid standpoint, but I don’t think it sensible to apply the same argument to bare-wood fingerboards.
It might be fun to speculate on what the dark buildup that develops on fingerboards actually is. I’d suggest an amalgamation of finger grease, fat, dirt, sweat, salt and dust – with a bit of dried blood thrown in for good measure. Bent strings won’t slide across ’board gunk as easily as clean wood, and the dirt and salt will attack your strings and shorten their life. If you think fingerboard gunk is mojo, then that’s your prerogative, but this ’board is getting cleaned.
My concern is always to preserve the vintage look and feel, so avoid scraping ’boards with a blade or credit card. Instead, I use naphtha – aka lighter fluid – applied to a piece of kitchen towel. Naphtha is a gentle cleaner that dissolves the detritus and lifts out the oil and grease. It does take a bit of time and you need to get right up close to the frets, but it will eventually remove all the dirt without taking any wood with it.
The only downside is that naphtha will lift out the wood’s natural oils too. Once the naphtha has completely evaporated, I wipe the ’board with a product such as Music Nomad F-One or Dunlop Lemon Oil, allow it to soak in, then wipe off any excess and buff up with a clean cloth.
Occasionally, a very dried-out ’board may need a couple of oil applications, but so long as the guitar is played regularly and kept clean, oiling the ’board is something that may only need to be done once a year. The final step is to polish the frets using Crimson Fret Rubbers – I’m pleased with the outcome.
Comes with strings
1 of 2The whole process takes up most of a day, but with its new set of strings, this ES-330 is playing and sounding better than it has in decades. I think it will be even better after a fret-levelling, and the nut looks like it has seen better days, but I’ll save all that for another day. In the meantime, I’ll concentrate on channelling my inner Grant Green…
Check out more of our DIY guides here.

